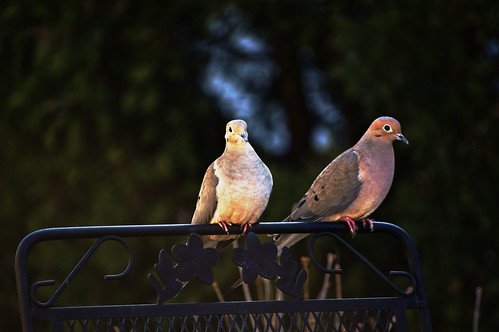
Now, high dynamic range imaging really fascinates me. HDR pictures have so much going on in them as a result of some tone-mapping, and when done right, they're visually stunning and rich. Compare my ersatz-HDR above to the original as it came out of the camera:
 It's close...
The thing is, I'm really not all that eager to go toss out heaps of dough on the big, heavy Photoshop Creative Suite software or anything else just to achieve the neat HDR effect (I'm using a laptop here, people, and space is at a premium), and, in fact, I'm perfectly happy with the results I've been getting from my cheap, little Photoshop Elements program since all I usually do are minor adjustments and resizing. But, sometimes, it's fun to go for more, I guess.
So, how did I get this?
Well... If anyone is interested, read on.
I shoot in the RAW format, make copies, and adjust the exposure bracketing using the Photoshop Camera Raw program (I think it's version 4.4). I set the original as the base, then I dedicate one copy for the brighter, over-exposed layer, and another for the darker, under-exposed layer by moving the exposure slider accordingly (usually to +3 and -3, but you can make as many copies with as many different exposure levels as you wish. Normal HDR uses in-camera exposure bracketing and a whole bunch of continuous shots which gives thing a cool sense of motion).
Whee fun...
After that, I set the base as the original and pile the other layers on top, set them to "overlay," and adjust the opacity until I'm happy. Then, flatten and save the image, and finally delete the copies and their ".xmp" files so that all that remains is the pseudo-HDR image.
Yes. It's clumsy, and sometimes it isn't worth the effort, and I really don't know what the hell I'm doing. However, if you compare to two pictures here, you can see that a lot of detail was brought out by looking at the wings of the two mourning doves. For example, you can actually see how the light plays upon the birds' feathers.
Unfortunately, this doesn't really work for every image, and this one barely works at all, and I suppose this technique would be good for pictures with a lot of things going on in them. But, if you've got the time, it's a fun thing to putter around with. Just make sure you work with copies.
Anyway, I like the way this one turned out and thought I'd share it with you all.
-DP
--
Posted By Dan to The Wisdom of a Distracted Mind at 4/10/2008 09:27:00 AM
good shooting
ReplyDelete... the technophobe in me has a headache ... the bean counter in me says, if you value the super cool photos, then you will get the value for your investment ... I am thinking you can find an alternative to getting the 'fresh packaged' suite, can't you ..?
ReplyDeleteI think that's supercool, but then I'm partial to mourning doves. Their soft coo is one of the most comforting sounds in my world.
ReplyDeleteBeth